Sunday, March 27, 2016

Week 2: Lots of new lumber

I was gone to a meeting in Houston all week, and came back to find lots of new lumber added to my house!

They decided to completely take down the wall between the dining room and kitchen, because the old studs were in terrible shape from former jobs that had cut them off in random places, and the wall was going to need a lot of modifications anyway.  Easier to start fresh!  You can see a couple things taking shape in this wall: the doorway on the far left (in the same place where it was before), the big opening for the glass cabinets and the pass-through, and the funny little opening in the bottom right.  What is that for?  I hate deep corner cabinets because stuff always gets lost in the far back where you can't reach, and lazy susans in corners irritate me because something is always falling off the back and jamming it up.  So my plan is to have no corner cabinet in the kitchen, and instead the unassuming lower right cabinet door in the dining room hutch will have a TARDIS-like opening that goes back and back... allowing me to mount big sliding rails on which to put Grandpa Ed's old table-leaf storage box that we rescued from the Ames house.  Then when we need to extend the dining room table before lots of guests arrive, we'll just open up the cabinet, pull a handle, and boom -- all the table leaves conveniently stored in one out-of-the-way place.  That's the plan anyway, we're still a ways from execution!

The other big new feature is the framing for the new ceiling.
We can't raise the ceiling on the old kitchen extension because of the joists helping to hold up the roof, so instead we're taking advantage of all our newfound ceiling height in the form of a raised tray ceiling in the middle of the kitchen.  I must say that I was slightly dubious when Paul (our kitchen designer) showed us this idea on paper, but standing underneath it gives an enhanced feeling of spaciousness that I didn't expect.

A lot of the new lumber went in to solve structural issues that we found when the walls and ceiling came down.
For example, a bunch of the studs next to the side window didn't actually connect to the floor, and it appeared that a lot of the weight in this corner of the house was resting on the window frame.  So a lot of new framing has been put in to shore up that corner and distribute the weight around the window.

We had an engineer in last week, and we were not going to get away with the thin beam that had been holding the weight over the kitchen extension, so a new beam went in to take its place, and they doubled up new wood next to the substandard joists that connect to the roof extension.

Finally, a new post went in between the bathroom door and the door to the back stairs, in order to transfer the load of this end of the beam directly down to the foundation wall.  Everything looks much thicker and sturdier now!

Thursday, March 17, 2016

Days 2 and 3: Ceilings come down

Our old kitchen had a wealth of ceilings!  It turns out that we had not two ceilings, not three ceilings, but four ceilings stuck up there.  Every previous kitchen remodel had just covered up whatever was there before.  No wonder we couldn't plug up the air leaks.


Now all the ceilings have come down and we're almost down to the rafters and studs.  Slowly it is being revealed how the extension on the house was built.


It looks like when the roof extension was put on, they just sawed a hole in the side of the house, leaving the load-bearing studs hanging (and leaving some of the original siding, which can be seen as the white painted boards in the upper right behind the big copper pipe).  Then they stuck the beam in to support the load of the main roof above.


However, when they (whoever cut the hole in the house in the 1960s) put the beam in they must have seen how all the studs had been cut off at uneven lengths, because they then used a variety of scraps as questionable shims to put the load-bearing studs in contact with the beam that's supposed to support the load.  In the center you can see a stud supported by a scrap of 1x2 and then one of the old white painted shingles that formed the original siding of the house.  Some of the load-bearing studs are just hanging in space.  Not good.  As Mike, the lead carpenter, was looking at this, he said "This part is going to need a lot of TLC."  By the way, that gap in the middle of the picture is where all the cold winter air had been freely flowing into our house and distributing itself among all the various gaps between the ceilings.


One thing I found amusing was this 4x4 post that holds up one end of the beam, right where the original house meets the addition.  It has strange gouges in it, all facing the same direction.  It looks like what happened is that when they were about to put the wallboard on after building the addition, they realized that the post was sticking out so the wallboard wouldn't go on flat, and then someone took a hatchet to the side of the post until enough of it was hacked away that they could put the walls on straight.


By the end of Day 3, the first dumpster was filled to capacity with all of those ceilings, the old countertops, the cabinetry parts that couldn't be reused, and some of the walls.  This dumpster has everything... including the kitchen sink.


Monday, March 14, 2016

Day 1: Demolition begins

When Beth got home form work today, she got a surprise!  Look ma, no cabinets!


Of course she knew that it was all starting up today, we spent all weekend moving our stuff out of the kitchen and setting up a temporary kitchen/dining area in a corner of the living room.

With all the cabinets, counters, and appliances out of the room, it sure seems a lot bigger!

We've found a way to re-use some of the upper cabinets, but luckily we didn't have any plans for the lower cabinets, because they didn't come out cleanly.

The hutch on the other side of the kitchen came apart neatly, and the more decorative top part is getting re-used as part of our basement craft area.

The ceiling came down too, revealing the lattice of boards that was keeping this false ceiling suspended about 9 inches below what we thought was the real ceiling.  However, when the whole thing came down, there was a hole in that older ceiling where it looks like an old light fixture used to be before the kitchen extension went on the house.  In that hole, we can see that the yellowish ceiling above our false ceiling is actually yet another false ceiling suspended on its own lattice of boards, and the real ceiling is the white one way up there.

Two things come to mind:  (1) We've got space to work with as we do our new ceilings and lighting, and (2) no wonder we couldn't seal up the cold air leak in the ceiling!

Kitchen renovations

When we moved into our house over 15 years ago, the kitchen was one of the nicest rooms in the house.  It's still a great room with a nice view over the garden, but as we have worked on all the other rooms in the house, the kitchen has stood as the Final Renovation Frontier.

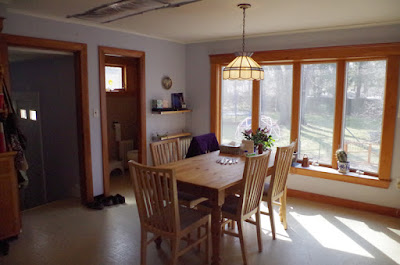
This is a typical view walking into the kitchen from the dining room, looking through the bow window into the back yard.


The kitchen is also a main corridor through the house, since it's the only way to get to the back door and the basement.  Thus it's usually the hive of activity.

It's been spacious and functional, and putting it out of commission for several weeks is a pain, so why renovate it?

Besides wanting to fix some traffic and storage issues, there was a more immediate problem...


See that nice big long hole in the ceiling, decoratively covered with plastic wrap and duct tape?  Yeah, about that...  When we had the outside of our house wrapped and re-sided, and insulation blown into the walls (see earlier posts on this blog) it had the nice benefit of the furnace not running ALL THE TIME in the winter like it used to.  That's when we noticed that the kitchen and Daniel's bedroom were unusually cold.  Massachusetts folks will fondly remember February 2015, which was a real doozy.  During the coldest, windiest parts of that winter I could feel cold wind coming out of the light fixture over the kitchen sink and freezing my hands as I washed dishes.  I brought home an IR camera from work and looked around, finding that the cold air was somehow traveling through the kitchen ceiling and seeping into any walls and floors that touched it.  In one spot on the stairwell wall (adjacent to the kitchen ceiling) I measured the baseboards to be zero celsius.  Yikes.

We had some insulators working on our attic, and they took a look inside the ceiling.  It turns out that sometime in the 1960s (?) an extension was put onto the house via the method of ripping a huge hole in the side of the house, throwing a beam across the top, and then plastering a false ceiling below the whole mess, not caring that there were huge gaps around the beam where air can freely blow from the roof space into the rest of the house.  So the insulators got out a saw and cut along the inside of the beam, and tried to seal it up with foam.  The problem is (we thought) that the beam does some complicated things above the cabinetry and where the kitchen meets the downstairs bathroom and back hall.  We couldn't get at those parts without making a lot more holes in the walls and taking down the cabinets.  Thus, cold air merrily continues to blow freely into the kitchen in the winter.

The only path forward was to completely rip down the ceiling and some of the walls.  As long as we're doing that, we might as well take down all the upper cabinets because they're connected by a lowered hollow space.  As long as we're doing that, maybe replace them, since some of them have veneer starting to chip off.  As long as we're doing that, why not also replace the bottom cabinets?  Hw about the countertop too?

Gee, why not just rearrange the whole kitchen while we're at it?  Next thing we know, we're in for a full-blown kitchen re-do.

Along the way, we'll solve the problem of all the cooking space being in a dark corner.  It's a big room, but when multiple people are cooking, they're all in one corner together while the rest of the kitchen is empty.


The tiny little bathroom adjoining the kitchen (more of a "powder room" will also get a face-lift.  I've always wanted to get rid of the smooth fake-wood-patterned wall material that's in there.  (I've always suspected that the walls are made of formica)  Also a previous plumbing problem, a previous window problem, and a previous bathroom fan problem have all left strange band-aid-like repairs in here, since how can one ever match the strange fake wood?  This room has needed some serious aesthetic help for years.  Luckily the beautiful pangolin art on the wall is a good distraction.


The back hall will also get some attention as part of this project.  It's a tiny space but it's both a main corridor and a storage area for coats and shoes.

In my mind's eye I can see what all these places will look like after we renovate, but once you start taking apart an old house, you never know what you'll run into!  I'm sure that obstacles and opportunities will present themselves as we go ahead with this adventure!